The automatic update failure, corrupt user profile, and unnecessary extensions are some of the concerns Google Chrome users often point out. Some of the steps to troubleshoot such common Chrome browser issues are as follows. Yet before you begin, ensure that latest Windows Updates are installed in your PC, and that the Microsoft security software […]
The post A Guide to Troubleshoot Issues with Google Chrome appeared first on Online Technical Support.
]]>
The automatic update failure, corrupt user profile, and unnecessary extensions are some of the concerns Google Chrome users often point out. Some of the steps to troubleshoot such common Chrome browser issues are as follows. Yet before you begin, ensure that latest Windows Updates are installed in your PC, and that the Microsoft security software is up to date.
Check for Unwanted Extensions
Click Google Chrome’s menu button, move your mouse over to More tools and click on Extensions. The menu button is the one denoted by three dots or horizontal lines and you can find it on the upper right side of the browser. Check for any suspicious extensions, such as shopping or discount adware or toolbar, which cause unnecessary behaviors when browsing.
 To confirm whether an unrecognized extension is not required for surfing sessions, click on the Details button below one and click View in Chrome Web Store button on the next page. In the web store, switch to Reviews tab and you can get consumer reviews of the extension you opened.
Reset Google Chrome
From the menu button of Google Chrome, choose Settings. Scroll down to and explore the Advanced drop-down. Then, check for the Reset heading by scrolling down to the bottom of the page. Click on the Restore settings to their original defaults button and confirm the same when Chrome prompts you to do so.

 Among other things, resetting the browser clears cookies as well as changes default startup window, home page, and search engine preferences. Passwords and bookmarks remain unchanged though.
Reinstall the Latest Update of Google Chrome
- Click on the Start button, search for Add or remove programs on the search box of the menu and open the respective link from the search results.
- In the list of programs, choose Google Chrome and click on the Uninstall Follow the instructions to complete it.
- Then restart your computer, and download and install Google Chrome from its website.
- Finally, click on the menu button, move your cursor over to Help option and then click Check for Update. If you cannot find that option, then you can be sure the browser is up to date. If required, install its latest update.
Rename or Delete the User Profile Folder
In case Google Chrome still does not work, remove the folder containing configuration info and settings of the browser. Remove the folder only in case none of the previous steps fixes issues with the Chrome browser. Usually, this folder stays hidden on Windows. To access it;
- Open Windows Explorer, choose Organize tab and click Folder and search options.
- In Folder Options, switch to the View tab and select the checkbox Show hidden files.
 Then go to C:\Users\<YourUserName>\AppData\Local and open Google\Chrome\User Data\Default. Delete the folder containing Chrome user data from here. This gets rid of the bookmarks and settings. In case you need bookmarks and other data, change the folder’s name. Otherwise, remove it.
Avoid Multiple File Downloads Automatically
- Click on the menu button, denoted by three dots or lines, on the top right of Google Chrome and choose Settings.
- Scroll down to and click on Advanced drop-down.
- Scroll down to and choose Content Settings.
- In the next page, click on Automatic downloads It is recommended to toggle the switch to Ask when a site tries to download files automatically after the first file.
This then avoids a website from downloading a file you do not need while downloading one you do want.
Avoid the Browser from Running in the Background
- Under Advanced settings, scroll down to and disable Continue running background apps when Google Chrome is closed.
This makes sure that even when you exit Google Chrome, the program closes. In case you use the Chrome browser for e-mail purposes and basic browsing, you might want to disable the following setting. In case you rely on the browser for messaging purposes or notifications, you can opt not to prevent it.
Block Popups in Chrome
In case you come across advertisements, a system clean up is recommended to block pop up ads. There are ways to block popups in Chrome, including changing permissions as and when they appear while surfing the web. A full scan of your computer with the latest version of an antivirus software might get rid of virus. Malware removal is one way to fully get rid of pop up ads if other steps do not help with that.
If you still come across any errors or issues while surfing the web on Google Chrome, get in touch with our tech support professionals for an advanced solution.
The post A Guide to Troubleshoot Issues with Google Chrome appeared first on Online Technical Support.
]]>Google Chrome can run into several errors that annoy users, including the no sound issue. However, prior to getting in touch with computer tech support professionals, make it a point to double-check if the issue is caused due to poor configuration. If you come across no sound issue only on Chrome browser, ensure the below […]
The post How to Troubleshoot No Sound Issue on Google Chrome appeared first on Online Technical Support.
]]>
Google Chrome can run into several errors that annoy users, including the no sound issue. However, prior to getting in touch with computer tech support professionals, make it a point to double-check if the issue is caused due to poor configuration. If you come across no sound issue only on Chrome browser, ensure the below things are in order:
- The Windows OS and sound drivers installed in the system are updated.
- The speaker button on the taskbar is not set to mute.
In fact, you can explore the audio options from the Windows 7 taskbar to see if Chrome audio or speaker volume is muted. For that, follow the below steps:
- Right-click on the Speakers icon on the bottom right of the taskbar and choose Open Volume Mixer.
- The Open Volume Mixer shows Speaker or Headphone, System Sounds, and the audio of Chrome. Note that for Chrome to appear in the list, an audio or video content should be opened in the browser.

In case somebody else has muted only Chrome audio from that, and kept the browser tab open, the Speakers icon on the taskbar will still show it as not muted. In case enabling audio fails to resolve the no sound issue on Chrome, move on to the next troubleshooting steps.
Clear Browsing Data from Chrome
For that, open the browser and press Shift, Ctrl, and Delete keys simultaneously on an active Chrome tab. After that, click on Clear Data.

Reset Chrome Settings to Default
- Click on the three-dot icon on the upper-right of Chrome, and choose Settings from the pop-up menu.
- Scroll down to and click Advanced to expand more Chrome settings. Then, search for and click on Reset settings (Reset browser settings to their original defaults).

This will show a pop up box with the message: “This will reset your startup page, new tab page, search engine, and pinned tabs. It will also disable all extensions and clear temporary data like cookies. Your bookmarks, history and saved passwords will not be cleared.” Click RESET to proceed if you are ok with that.
Uninstall and Reinstall Google Chrome
Do this as a last resort to fix the no sound error. Note that resetting and uninstalling Chrome browser will lose some browsing information. In fact, while uninstalling the browser from Windows you can choose Also delete your browsing data.
After uninstalling the browser, download a new version of Chrome and install it on the PC to see if that fixes no sound. In case it does not, your audio driver or other hardware may require a troubleshooting. For that, get in touch with our computer tech support team via the toll-free number.

The post How to Troubleshoot No Sound Issue on Google Chrome appeared first on Online Technical Support.
]]>The “Aw, Snap” error is one of the common errors which appear when people surf the web on Google Chrome. It suggests that Chrome ran out of memory, even though the computer has sufficient RAM. Even the option to block popups in Chrome by default might be enabled, so you need other methods to troubleshoot […]
The post How to Troubleshoot Aw Snap Error in Chrome Browser appeared first on Online Technical Support.
]]>
The “Aw, Snap” error is one of the common errors which appear when people surf the web on Google Chrome. It suggests that Chrome ran out of memory, even though the computer has sufficient RAM. Even the option to block popups in Chrome by default might be enabled, so you need other methods to troubleshoot “Aw, Snap”. Note that popup advertisements may slow down the browser.
Restart Google Chrome
The error tends to get fixed if the user quits the page and opens it again. Usually, restarting can load the tab where “Aw, Snap” was shown. If that happens, move to the next step.
Open the Aw, Snap! Tab on Incognito Mode
For that, follow the below steps on Chrome:
- Click on the three-dot icon to the top-right corner of Chrome.
- Then, choose New Incognito Window from the pop-up menu.
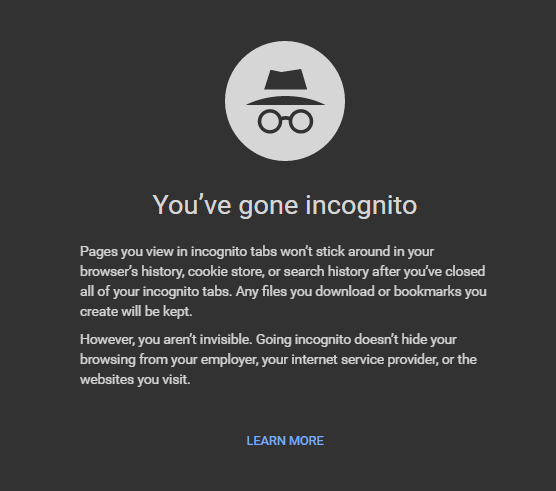
If the same webpage loads fully in incognito, some extension may have caused the issue. If it is loading on incognito tab, try disabling the add-ons and see if that works (given below). If not, proceed to the next step.
Clear Chrome’s Browsing Data
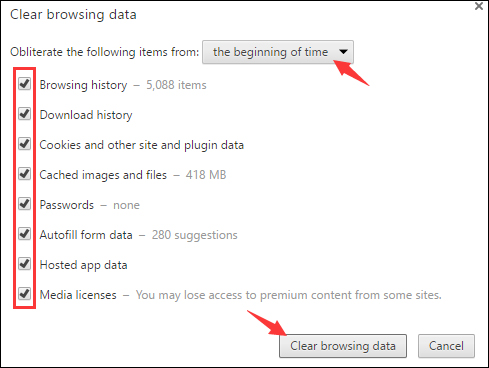
The saved information on visited web pages in Chrome can affect page loading in subsequent browsing sessions. To clear that, follow the below steps on an active Chrome tab:
- Select any of the Chrome windows to make it active, and press Ctrl, Shift and Delete
- In the dialog box that pops up next, click Clear Data. Also make sure the checkboxes under the Basic and Advanced tabs have a tick next to each item, which will be there unless you have deselected it.
Disable Add-ons of Google Chrome
Some extensions installed in Chrome might cause webpage loading errors. To troubleshoot, turn off all the add-ons in the browser, identify the one causing the issue by opening the webpage after enabling each individually, and disable the problematic add-on. To access the list of extensions installed on Chrome browser, follow the below steps:
- Click on the three-dot icon in the upper-right corner.
- Choose More tools from the pop-up menu, and then click Extensions from the next list.
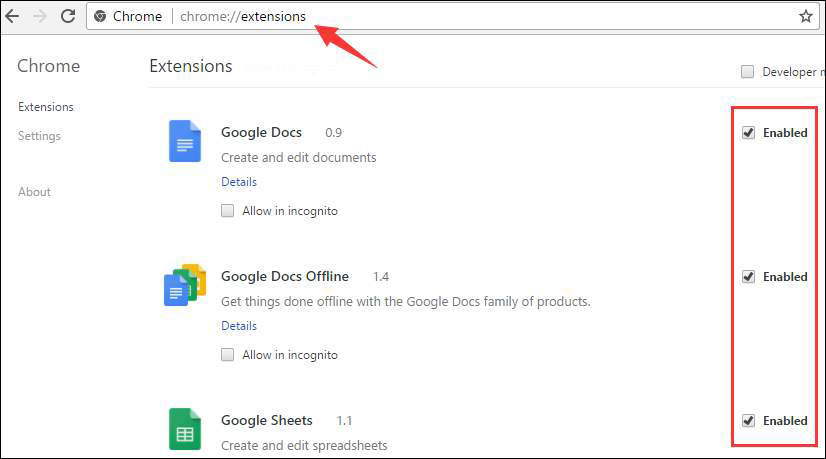
After disabling each add-on, open a webpage and do the needful.
If you are still wondering how to troubleshoot Aw Snap error, call our online computer tech support professionals for a thorough troubleshooting of your PC.
The post How to Troubleshoot Aw Snap Error in Chrome Browser appeared first on Online Technical Support.
]]>Slow page loading on Chrome may happen due to several reasons, including adware, malware, and if the browser is not up-to-date. Regardless, find the troubleshooting steps to boost page load speed on Chrome and make it perform up to scratch. Update Google Chrome Usually, Chrome installs an available update in the background once users close […]
The post How to Enhance the Page Load Time on Google Chrome appeared first on Online Technical Support.
]]>
Slow page loading on Chrome may happen due to several reasons, including adware, malware, and if the browser is not up-to-date. Regardless, find the troubleshooting steps to boost page load speed on Chrome and make it perform up to scratch.
Update Google Chrome
Usually, Chrome installs an available update in the background once users close and reopen the browser. However, if you have not closed Chrome for a while, a pending update might have to be installed manually. When a Chrome update is pending, users can install that by clicking on the notification on the upper-right corner. Note that the notification will be shown in green, orange, or red color depending on how many days it stays pending. If you cannot see an option to update upon clicking on the menu button, Chrome is up-to-date.
Turn Off Prefetch in Chrome
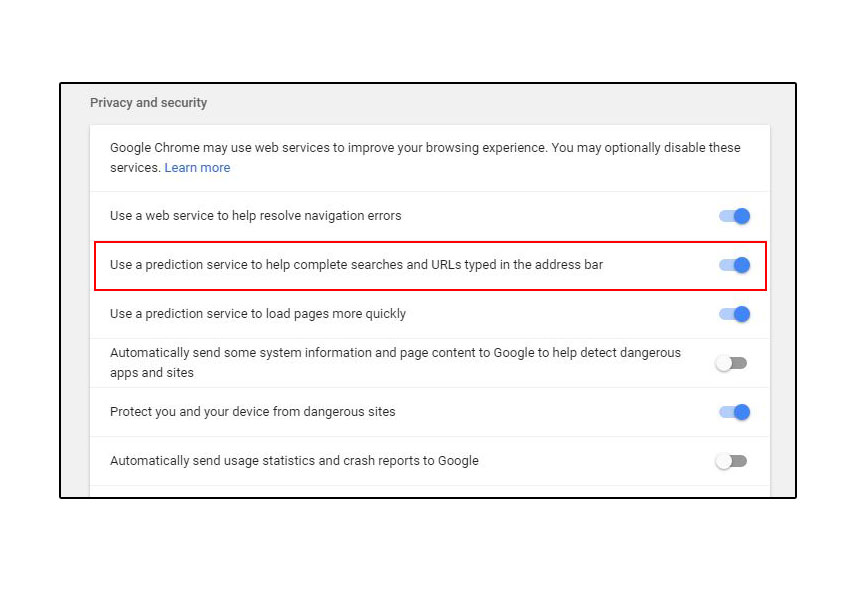
This feature caches external web page links, while surfing the web on Chrome, in order to make that page load up faster. Although its purpose is to enhance the speed of browsing with caches, the fact that Chrome takes time to store the web page information in advance, it might slow down the active tab. If you want to keep Chrome from caching links within a web page, which you will visit by clicking through, follow the below steps.
- Click on three-dot menu to the upper-right of Chrome and choose Settings from the pop-up list.
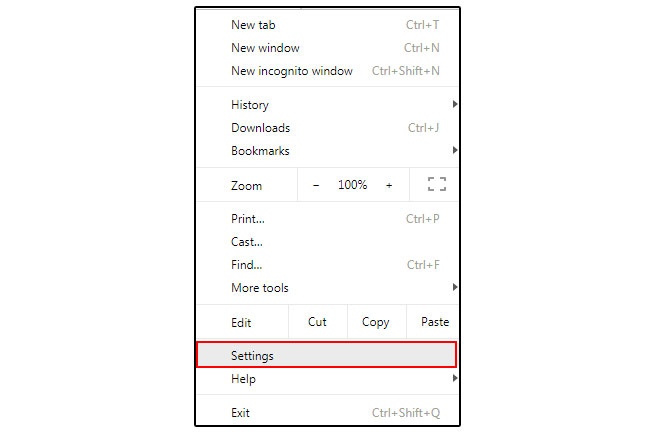
- Then, scroll down to and expand Advanced settings, and under the Privacy and Security heading, enable Use a prediction service to load pages more quickly.
Disable Unwanted Extensions on Chrome
An add-on can come in handy but it might as well weigh down browsing on Chrome, especially if plenty of extensions are installed. For instance, who needs a third-party malware removal add-on if paid antivirus software is installed on the computer? Even if you have not installed such extensions on Chrome, it is best to disable unwanted add-ons to boost page load time. For that, follow the below steps.
- Click on menu button to the upper-right of Chrome, choose More tools and click on Extensions.
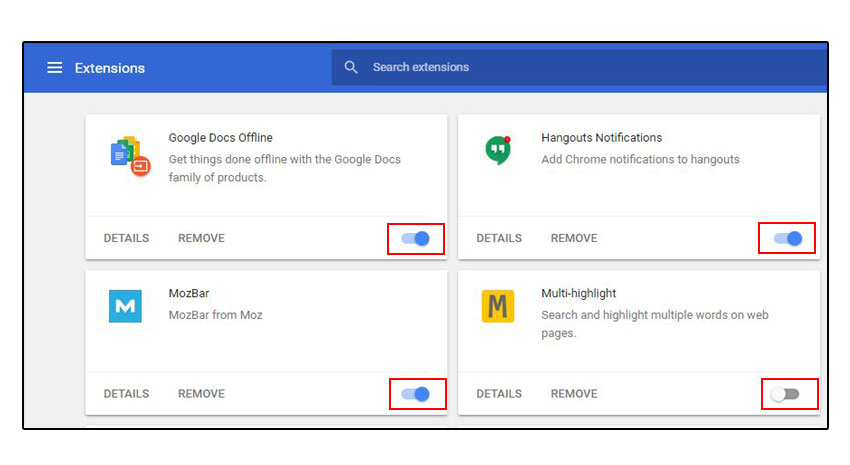
- Disable each add-on you do not use at present by unselecting the respective checkbox. In case you feel the need to use the disabled extension in future, navigate the same path to enable the same.
Furthermore, it is recommended to scan for spyware or other potentially unwanted programs with a Malware removal software installed on the PC. If your slow Chrome leads to errors while surfing the web, contact a browser support professional to diagnose and fix it.
The post How to Enhance the Page Load Time on Google Chrome appeared first on Online Technical Support.
]]>Google has done a pretty good job in keeping the pop-up windows under control in their Google Chrome browser. However, several users still complain that their Google Chrome browser often opens up multiple pop-ups and makes web browsing an irritating process. If multiple pop-up windows are invading your traditional internet browser, then you can confirm […]
The post How To Block Popups In Chrome appeared first on Online Technical Support.
]]>
Google has done a pretty good job in keeping the pop-up windows under control in their Google Chrome browser. However, several users still complain that their Google Chrome browser often opens up multiple pop-ups and makes web browsing an irritating process.
If multiple pop-up windows are invading your traditional internet browser, then you can confirm that there is something wrong with your internet browser. Fortunately, there are numerous simple tips and tricks that allow you to overcome these annoying advertisements and browse the web without any hassles. Here is how to block popups in Chrome.
Enabling the Blocking Feature of Chrome
- Start your PC or laptop and open the Google Chrome internet browser.
- Now, drag your mouse pointer to the upper right-hand corner of Google Chrome and click on the menu icon. Now, select Settings from the drop-down.
- Now, type Popups into the search bar and then click on Content Settings. Here, if you find Allowed under Popups, it means that the popups are not yet blocked.
- Simply turn off the switch right next to Allowed to block popups in Chrome.
Now, check the approved list of sites in your Chrome browser by going back to Popups and then slowly scroll down to Allows until you see the list of approved sites. Click on the three dots next to any one of the apps and select Remove to allow pop-ups from these sites. Do the same procedure on all the preferred sites before closing your browser.
Scan for Malware

If you are still encountering the same issue even after you block popups in Chrome browser, then the pop-ups might be coming from the websites that you are accessing. So, find a reliable antivirus program and then install it on your PC or laptop. Now, run a full scan of your PC to diagnose any threats. If the scan results suggest that your PC is safe, download a couple more apps to ensure that your system is free of virus and malware attacks.
Uninstall Odd Software
Go to the Control Panel of your PC and then click on Programs and Features. Now, look at the programs and if anything looks odd, make sure to uninstall them from your computer. This will most probably help you solve the issue. However, if you are still not able to solve the issue, get in touch with a computer support technician for assistance.
The post How To Block Popups In Chrome appeared first on Online Technical Support.
]]>Google Chrome has emerged as the most popular web browser out there. It is popular across all platforms, both desktop and mobile. Faster browsing experience and simple user interface are the two major features that make people attracted to Google Chrome. Furthermore, the browser enjoys better tech support. Users can quickly find forums on how […]
The post Troubleshooting Host Issues In Google Chrome appeared first on Online Technical Support.
]]>
Google Chrome has emerged as the most popular web browser out there. It is popular across all platforms, both desktop and mobile. Faster browsing experience and simple user interface are the two major features that make people attracted to Google Chrome. Furthermore, the browser enjoys better tech support. Users can quickly find forums on how to fix Google Chrome issues and find guidelines to fix specific problems with the browser.
Google Chrome allows you to customize your browser so that it works efficiently in accordance with your needs. The areas that you can modify include visual themes, privacy preferences, Flash and plug-ins. While using Chrome, the user is allowed to modify the aspects of the program or application in use. However, you may come across unwanted issues after you make so many changes in the Chrome settings. Restoring Chrome back to the default settings would fix all the issues in an instant.
How To Know If Personalized Chrome Settings Is The Cause Of Problems
Before restoring Chrome back to the default settings, it is good to verify whether the current issues you are facing are actually resulting from the any changes in the Chrome configuration. If you receive the error message “Resolving Host”, it is sign that some of changes in configuration are the cause of the problem. You can fix this problem by disabling the DNS prefetching service in Chrome. Follow the below instructions for the same.
Instructions
-

Google Chrome Web Browser Open Chrome and navigate to the wrench icon which is located at the upper right corner of the screen.
- Select Preferences or Options from the resulting menu.
- This will open a new screen. In the new screen, navigate to the tab labeled Under the Hood. This will open another window.
- Make sure that the checkbox next to Use DNS prefetching to improve page load performance is unselected. You can find this checkbox in the section titled Privacy in the screen. Remember that this option is given by different names in some Chrome versions. If you don’t find the option, look for the tab titled Predict network actions to improve page load performance. Unselect the checkbox before the option to proceed.
- Exit Chrome settings and browser.
- Restart the application now and check if the issue persists. Try to load a few new web pages and see if the issue has really been fixed.
You have seen how to fix Google Chrome issues. Keep your browser updated to avoid frequent crashing or similar issues.
The post Troubleshooting Host Issues In Google Chrome appeared first on Online Technical Support.
]]>If you are a Google Chrome user, you may see unwanted malware and software installed in your PC. Also, you may noticed the following issues: Pop-up advertisements not going away Homepage of your Google Chrome web browser keeps changing or not set to the default page Unnecessary Chrome extensions or toolbars returning to the browser […]
The post How To Block Unnecessary Pop-Ups, Ads, And Malware In Chrome appeared first on Online Technical Support.
]]>
If you are a Google Chrome user, you may see unwanted malware and software installed in your PC. Also, you may noticed the following issues:
- Pop-up advertisements not going away
- Homepage of your Google Chrome web browser keeps changing or not set to the default page
- Unnecessary Chrome extensions or toolbars returning to the browser even after removal
- You get redirected to unwanted and unfamiliar web pages
Some of the steps that you can do to block pop-ups in Chrome and to get rid of unwanted software are explained below. After performing these steps, make sure that you download files from only those websites that you know are secure.
Removing Unnecessary Programs From Chrome On Windows
If you are using a Windows computer, you can seek help of the Cleanup Tool offered by Google Chrome to find suspicious programs installed in your computer and remove them. If you are using a Linux or Mac PC, move ahead to the next set of instructions.
- Visit the website of the Chrome Cleanup Tool on your Windows computer.
- Click on the Download Now Read the terms and conditions, and then click on the Accept and Download button.
- When the download is finished successfully, you will be able to see it at the bottom of the browser.
- Click on the file name and Windows will ask you if you need to run the program. Click on the Run
- The tool will scan your PC and when scanning is finished successfully, you will see a list of malicious software installed in your PC, if any.
- If there are any malicious programs detected in your computer, you need to click on the Remove Suspicious Programs
- After the programs are removed successfully, Google Chrome will open a new tab and will ask you to reset all the settings. Click on the Reset button to start afresh.
Remove Unnecessary Programs From Chrome On Mac
If you are using any antivirus programs, run the program to find and remove malicious programs. After that, follow the steps given below to get rid of all the programs installed in your computer that you do not use or remember installing.
- Open Finder on your Mac computer.
- Click on the Applications option located at the left.
- Look for programs that you have not installed and right click on the name of the unwanted programs.
- Select Move to Trash from the list of options.
- After finishing, right click on Trash and choose Empty Trash.
The post How To Block Unnecessary Pop-Ups, Ads, And Malware In Chrome appeared first on Online Technical Support.
]]>Google Chrome users have long struggled with the erratic behavior this browser puts up around plug-ins. One of these that Chrome commonly has friction with, is Shockwave Flash. You don’t have this problem in other browsers, at least not in a severe level. With Chrome, you get anything from lack of responsiveness to an immediate […]
The post Fixing Shockwave Flash Crashes In Google Chrome appeared first on Online Technical Support.
]]>
Google Chrome users have long struggled with the erratic behavior this browser puts up around plug-ins. One of these that Chrome commonly has friction with, is Shockwave Flash. You don’t have this problem in other browsers, at least not in a severe level. With Chrome, you get anything from lack of responsiveness to an immediate crash. Explained below is how to fix shockwave flash crashes in Google Chrome browser.
Why You Have This Problem
Chrome handles Flash content differently from the other browsers, like, say, Firefox. The main distinction is that the Flash installation which Chrome uses is internal. This doesn’t pose a problem when the rest of the browser components are working smoothly, and there’s only the one Flash that Chrome is trying to use. And from this, you would have already guessed that the browser gets confused sometimes, as to which Flash to use. When it starts pulling on the OS installation of Flash as well as the one that’s inside it, the user sees some serious browser lag. Followed by every instance of Flash crashing, and this is when you start getting messages on the yellow strip.
And as for how to fix shockwave flash crashes in Google Chrome by yourself, you need to first understand that it likely happened because of a Flash install conflict. Do the following to remove that.
- Run the Chrome app.
- Click on the address bar space and type in about: plugins. Hit Enter.
- You’ll see a list of all the plug-ins installed in the browser. Find the Flash entry here.
- Go to the top right of the page and find the [+] Details Hit this to see the full plug-in listing. Return to the Flash entry.
- There’s probably two entries for Flash, as already explained. Disable the internal installation from the AppData
- Close the tab and restart the browser. If that worked out well, then you shouldn’t have any further problems from flash component conflict.
Doing this disables the automatic update option for the Flash component. This means you’ll have to manually check for updates from that point on if you want well-run plug-ins and good streaming capabilities in the browser.
There’s also a hidden page in the browser that tells you if any of the components are at odds with the running of the browser. The link for this is chrome://conflicts.
The post Fixing Shockwave Flash Crashes In Google Chrome appeared first on Online Technical Support.
]]>Despite the fact that Google Chrome is the most popular web browser, it is not completely void of technical glitches. Thankfully, the developer of this program is very attentive to any reported issues and is ready to roll out timely fixes so that the users would not regret their decision to use Chrome as their […]
The post Two Easy Methods To Address Chrome Crash With Flash Player appeared first on Online Technical Support.
]]>
Despite the fact that Google Chrome is the most popular web browser, it is not completely void of technical glitches. Thankfully, the developer of this program is very attentive to any reported issues and is ready to roll out timely fixes so that the users would not regret their decision to use Chrome as their default web browser.
According to experts, most of the problems in Google Chrome are not caused by any technical loopholes in the programming of this application but due to external programs that are associated with. Take for instance when you see that Shockwave Flash has crashed Chrome. It is caused by the corrupted or outdated version of Shockwave Flash plug-in in the browser.
In short, Google Chrome is not essentially responsible for many of the issues that you chance to run across in it. Let us take a look at the technical sides when you see that Shockwave Flash has crashed Chrome and the steps to resolve this problem.
Shockwave Flash In Google Chrome
Shockwave Flash is a third party plug-in in Chrome. It helps you view flash contents in the web pages that you visit. However, you do not have to install it separately because Chrome already has it. Normally, it is updated when Chrome is updated. But it will not necessarily happen for good. At any point, the Flash Player might stop updating itself along with Chrome.

When it misses a few updates with Chrome, you would begin to see that Shockwave Flash has crashed Chrome. When this happens, you can choose between two different methods to fix the problem; update the Flash Player manually and make sure that it is compatible with Chrome or uninstall and reinstall Google Chrome.
Update Flash Player
By updating Flash Player and ensuring that it is compatible with Google Chrome, you can fix the Chrome Crash due to the outdated version of Flash Player. If that does not the fix the problem, the next possible solution is uninstalling and reinstalling Chrome.
Google Chrome is a free web browser so you can download and install it as and when you wish. Go to the Control Panel, and then to Programs and Features. Highlight Chrome and click on the Uninstall button. Follow the on-screen prompts and you are done.
After that, reinstall Chrome. When Google Chrome is reinstalled, you would get a fresh version of it along with a compatible version of Flash Player plug-in.
The post Two Easy Methods To Address Chrome Crash With Flash Player appeared first on Online Technical Support.
]]>If you wonder what makes Google Chrome crash, the answer is very simple. When Google Chrome is launched, it is supposed to read certain files. But if these files are corrupted; Chrome cannot function as normal. So you should repair these corrupted files first. As you might have noticed already, Google Chrome is an advanced […]
The post Google Chrome Crashing Often – Reinstall The Program appeared first on Online Technical Support.
]]>
If you wonder what makes Google Chrome crash, the answer is very simple. When Google Chrome is launched, it is supposed to read certain files. But if these files are corrupted; Chrome cannot function as normal. So you should repair these corrupted files first.
As you might have noticed already, Google Chrome is an advanced web browser. It is quite different from most other web browsers like Mozilla Firefox and Internet Explorer. As such, Chrome has an entirely different ecosystem and settings.
Fixing Google Chrome Crashing Issues
When Google Chrome keeps crashing or runs into any Google Chrome error, you need to ensure two things. First of all, it is important to make sure that all files associated with Chrome are okay. Secondly, make sure that your system is compatible with Google Chrome. You need to choose an appropriate version of Chrome based on the configuration of your computer.
Details like the RAM capacity, free space in the installation drive, operating system, etc., need to be taken into account as well. If you are running a 32-bit version of Windows operating system in your computer, you need to choose a 32-bit compatible Chrome version as well. Once you have ensured these things, you can proceed with the below steps of troubleshooting the Google Chrome crashing problem.
Restart Your Computer
Sometimes, a simple system restart would fix the problem. When you restart the computer, all running services associated with Chrome will be restarted as well. This will repair small glitches and make Chrome to work normally.
Disable All Unwanted Plug-Ins
Check if your Chrome web browser is laden with too many unwanted plug-ins and disable some of them. This way, you can avoid a large number of Chrome issues. Occasionally, Google Chrome may crash with certain plug-ins. By removing these plug-ins, you can troubleshoot the problem outright.
Uninstall And Reinstall Chrome
If none of the above steps resolves your Google Chrome crashing error, uninstall and reinstall Chrome. When you execute this step, your corrupted version of Chrome will be replaced with a fresh version. Latest versions of Chrome would contain bug fixes and solutions to many security loopholes in your computer.
To uninstall Chrome, go to the Start button and choose Control Panel from the menu. Open Programs and Features, choose Chrome and then uninstall it following the on-screen prompts. After that, reinstall Chrome.
With the latest version in your computer, you should no longer face any Google Chrome crashing problems.
The post Google Chrome Crashing Often – Reinstall The Program appeared first on Online Technical Support.
]]>

