Most PC crashes are due to overheating of the machine, faulty hardware, corrupt driver, and so forth. In case you do not know the underlying cause behind it, try the methods outlined in this online computer repair guide.
Restart the System
If you can use your keyboard and mouse, you can restart your Windows computer. To reboot it, follow the steps mentioned below.
- Click on the Start button, and then select Shut down. Alternatively, long-press on the Power button on the CPU to turn off the computer.
- Once Windows is fully turned off, press the Power button on the CPU to reboot it.
Ensure that the CPU Works Correctly
If you feel it keeps crashing due to overheating, check and ensure the CPU is working fine.
Clean the case of your computer – If there is dust on the case, it may clog the fan inside it and block flow of air. Thus, you have to clean the dust around it to ensure the fan works fine.
Make sure there is proper ventilation – Place your system in a room with better ventilation. Avoid pushing the case up against a wall or do not block its air vents.
Ensure the fans are running – If you are unsure as to why your system starts overheating, open its case and then check the fans inside it are running.
Boot your Computer in Safe Mode
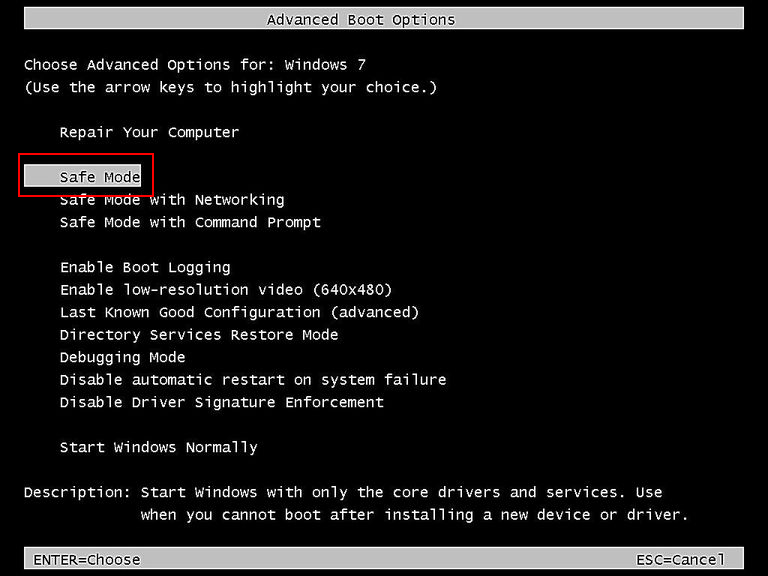
If your PC crashes due to programs, uninstall them to resolve the issue. Follow the below steps to boot your system in Safe Mode and configure to uninstall the programs.

- If your computer boots up normally, press the F8 key to boot in Safe Mode. Else, in case you can boot to the sign in screen, you can access the mode from there.
- On the sign in screen, press and hold down Shift on your keyboard.
- While holding down the key, click on the Power button and choose Restart. This will reveal the Windows Recovery Environment screen.
- On the Windows RE screen, click on Troubleshoot. On the next screen, click on Advanced options, and choose Startup Settings
- Click Restart. The PC then reboots, and a different screen with plenty of startup options shows up.
- Press the number 4 key to access Safe Mode without access to the network. In case you need to do any research online after booting your system in the mode, press the number 5 key to enter it with network access.
More Steps to Boot in Safe Mode
If you cannot boot your computer normally, follow the below steps to boot into the mode.
- Press its Power button to start your computer, and then hold down the button for a few seconds until it shuts down. Repeat this over two times until the screen Preparing Automatic Repair If you have seen this

- screen first up when you turn on your system, skip to the next step.
- Wait for the OS to diagnose your computer.
- On the Startup Repair screen, click on Advanced options. Windows then will reveal the Recovery Environment screen.

- Then go to Troubleshoot > Advanced options > Startup Settings and perform a Restart by clicking on it.
Configure to Enable Uninstalling Programs
Once you are in Safe Mode, you are usually not allowed to either install and/or uninstall programs. There is a workaround to enable both. For that, follow the below steps.
- Press the Windows and R keys simultaneously.
- In the Run dialog box, key in regedit and press Enter.
- In the Registry Editor, navigate to the path HKEY_LOCAL_MACHINE\SYSTEM\CurrentControlSet\Control\SafeBoot\ and right-click on Minimal. In case you are in Safe Mode with access to the network, then right-click on Network.

- Move your mouse over to New and select Key.
- Assign the name MSIServer to the key.
- Change the Data value of Default to Service.
- Close the Registry Editor. You can now uninstall the program(s) that is causing the crash.
Once you have uninstalled, restart your system in standard mode and then it should be working.
Update Drivers on your Computer
The corrupt driver can also lead to Windows crashes so update it to resolve the issue. You can manually update a problem driver from Device Manager, or by downloading and installing the correct driver from its manufacturer website. Perhaps the online computer repair trick may work if faulty drivers are to blame.
Run the System File Checker
The utility is useful to repair corrupt system files. In case you cannot boot your system normally, first boot it into Safe Mode using Command Prompt.
- Follow the steps as explained above until you reach the Startup Settings
- On the screen, press the number 6 key to boot it in Safe Mode with cmd.
- Then, key in sfc /scannow command in it and press Enter.

- Wait for it to finish and it will resolve detected issues automatically.
- Once it is done, close Command Prompt and reboot your system normally. It should now be working.
In case you can boot it normally, then sign in as Administrator and execute the command.
- Key in cmd in taskbar’s search box and open it.
- Key in sfc /scannow and press Enter.
- Wait for some time for Command Prompt to resolve issues, after it is done with scanning. Once the “Verification 100 percent completed” message appears, close it and try to open the error program.
If you still cannot resolve your system crashes, then get in touch with our online computer tech support professionals for advanced troubleshooting.


